Archive for the ‘baking’ Category

Chocolate Croissant Bread Pudding

November 25th, 2010

Warning: This dessert is not for people who are counting calories. If you even attempt to make or eat this dessert you might as well just throw your diet out the window, but it will be worth it, I assure you.

Where do I begin describing this dessert? I really should have video taped the expressions of the lucky few who were able to try this dessert at a recent potluck. Those faces were priceless. After one bite you could see a total change in their face from normal to absolute bliss to bewilderment at how a dessert could be so so good. It really made me laugh that everyone had the same reaction. However, its not just the chocolate croissant bread pudding alone that makes it amazing, it requires a few simple steps in order to achieve that “OMG” moment.  First, make sure your bread pudding is fresh from the oven and still warm or just microwave it for a few seconds to get it nice and warm again. Second, place a nice big scoop of vanilla ice cream on top. Lastly, make sure to get a nice spoonful of the bread pudding and ice cream in one bite.

This dessert is definitely a crowd pleaser and perfect for the holidays. On that note, Happy Thanksgiving and I hope you’ll be enjoying this bread pudding at one of your holiday parties!

Chocolate Croissant Bread Pudding
(adapted from foodnetwork.com)

Ingredients

  • 1 stick unsalted butter
  • 1 cup sugar
  • 1 1/2 tsp. cinnamon
  • 1 tsp. vanilla extract
  • 5 large eggs, lightly beaten
  • 2 1/2 cups heavy cream
  • 12 croissants
  • 1 cup semi-sweet chocolate chips

Directions

  1. Preheat oven to 350 degrees F.
  2. Break up the 12 croissants into 1 inch pieces.
  3. Lightly butter a 9×13 in. baking dish. Layer croissant pieces and chocolate chips into the baking dish. Making sure to evenly distribute the croissant pieces and chocolate chips.
  4. Combine butter and sugar in a separate bowl until well blended. Add cinnamon and vanilla and mix well. Add the 5 lightly beaten eggs. Add the heavy cream. Make sure everything is well blended.
  5. Pour the egg mixture onto the croissants. Soak for 8 to 10 minutes. You can push the croissants down to ensure coverage by the egg mixture.
  6. Cover with foil and bake for 35 minutes. Remove foil and bake for 10 minutes to brown the top. The bread pudding is done when the custard is set, but still soft. Allow to cool.
  7. Serve warm with vanilla ice cream on top. Enjoy!

Buttery flaky croissants. I bought a 12-pack of croissants from Costco. Great deal for $5.79!

Croissants broken up into 1 inch pieces

Chocolate chips interspersed with the croissant pieces

Letting the egg mixture soak through

Finished product out of the oven

Chocolate Croissant Bread Pudding with Vanilla Ice Cream - Unfortunately, this picture does not do it justice and cannot show you how truly amazing it is, but it is believe me.

Lemon Cupcakes

June 27th, 2010

These lemon cupcakes were a nice refreshing change to the usual cupcake flavors I bake. The cake was soft and moist and the sweet tangy frosting was so addicting. I must admit I was a little sad when the last cupcake was gone. I could not get enough of these cupcakes! Next time, I’m definitely making the whole recipe instead of halving it.

Lemon Cupcake

Lemon Cupcakes
(adapted from allrecipes.com)
makes about 24 cupcakes

Ingredients:

  • 1 cup butter, softened
  • 2 cups sugar
  • 3 eggs
  • zest of 2 medium lemons
  • 1 teaspoon vanilla extract
  • 3 1/2 cups all-purpose flour
  • 1 teaspoon baking soda
  • 1/2 teaspoon baking powder
  • 1/2 teaspoon salt
  • 2 cups sour cream

Frosting:

  • 4 tablespoons butter, softened
  • 4 1/2 cups powdered sugar
  • 4 tablespoons lemon juice
  • 1/2 teaspoon vanilla extract
  • zest of 1 medium lemon
  • 2 tablespoons milk
Directions:
  1. In a mixing bowl, cream butter and sugar. Beat in eggs, one at a time. Add lemon zest and vanilla; mix well.
  2. Combine dry ingredients; add to creamed mixture alternately with sour cream (batter will be thick).
  3. Fill greased or paper-lined muffin cups with 1/4 cup of batter. Bake at 350 degrees F for 25-30 minutes or until a toothpick inserted near the center comes out clean. Cool for 10 minutes; remove to wire racks to cool completely.
  4. For frosting, cream butter and sugar in a small mixing bowl. Add lemon juice, vanilla, lemon zest and milk; beat until smooth. Frost cupcakes.

Hello Again

June 3rd, 2010

Wow…1.5 months no blog! I must apologize for the lack of activity on my blog, unfortunately life gets in the way sometimes (the good and the bad). Anyway, the good news is I am back and do not expect anymore interruptions in the near future.

In the last month, I discovered (actually a friend told me) about a hole in the wall baking supply store that has become my new favorite store. I love how the store front can look so deceivingly small, but once you enter its like a whole other world. They have pretty much everything imaginable there, a baker’s dream. Quite the selection of cupcake liners, all kinds colors and patterns and an impressive array of bakery boxes to hold cakes and cupcakes. I could spend hours in there. My friend’s birthday gave me the chance to bust out my window cupcake box that I just bought from there and I absolutely love it! It’s got the Sprinkles vibe with the brown cardboard box look, but the best part is the window and the holders inside.I made dark chocolate cupcakes with pink vanilla bean frosting and H-A-P-P-Y B-I-R-T-H-D-A-Y candles on top. I guess the box made it look so legit that my friends thought I bought cupcakes from a real bakery haha. So, thank you to my new baking supply store for helping my cupcakes step it up a notch in the presentation department!

Dark chocolate cupcakes with brown liners like Sprinkles!

Pink vanilla bean frosting

Cupcakes placed in their holders

Cupcakes placed in the holders

Check out the window!

Love these candles!

The Baked Brownie

April 15th, 2010

Dark. Rich. Decadent. This brownie is over the top from its high quality ingredients to all its acclaim as the “Best Brownie”. Oprah even named it one of her favorite things and for some reason when Oprah says its her favorite somehow its gotta be a favorite of ours too. From the moment I saw this recipe in my newly purchased Baked:New Frontiers in Baking cookbook I knew I had to find out what all the fuss was about.

Let’s start with the ingredients. This recipe required quite a few specialty ingredients: quality dark baking chocolate, Valrhona cocoa powder, and instant espresso powder. Took a few phone calls to find the elusive Valrhona cocoa powder, but I finally tracked it down at my local Sur la table. Next was the dark baking chocolate which I also found at Sur la Table. I decided to go with Scharffen Berger Dark Baking Chocolate (62% cacao) which was one of the suggested brands. Buying the best ingredients comes at a hefty price. One 6 oz. Scharffen Berger bar was $8.50 and a box of Valrhona cocoa powder was $10.50. Taking another look at my shopping list I realized I needed 11 oz. of chocolate, so I had to grab one more bar and that brought my total to $27.50 for just those two ingredients. Ouch. This is when the fear started to set in. What if it doesn’t turn out? What if I completely hate it? I’d hate to waste the most expensive brownie I’ve ever made. Not gonna lie here, I’m a brownie mix type of girl. Betty Crocker $2.99 box mix to be exact and I think it tastes better than some of the from scratch recipes I’ve tried in the past.

High end ingredients in hand, the moment of truth was just a recipe away. The process was relatively simple: combine dry ingredients, melt chocolate, mix, and bake. I made sure to be extra careful, following the directions closely and rechecked that I didn’t leave out any steps or ingredients. About 27 minutes later my brownies where baked and ready to be cooled. The aroma of deep rich chocolate filled my kitchen and it smelled so delicious. It was hard to be patient and wait until the brownies cooled before I could cut myself a piece, but when I did let me tell you it was unlike any other brownie I’ve tasted. So chocolately, so fudgy, so moist, and oh so yummy! I could really taste what a difference quality chocolate and cocoa powder could make. The chocolate taste was much more richer and deeper. I absolutely love dark chocolate and this brownie exudes dark chocolate to the point that I can’t help but love it. So, know I now exactly why this Baked Brownie was dubbed the “Best Brownie” and why it’s Oprah’s favorite and now it’s mine too. Don’t get me wrong, I still have love for my Betty Crocker brownie mix which is much more wallet friendly, but now I’ll have a favorite brownie recipe for those special occasions that will help it make it even more special and decadent.

Love my new cookboook

The Baked Brownie

(more…)

A Dozen Easter Cupcakes

April 4th, 2010

Happy Easter! It’s been a long 40+ days and I’m excited to finally eat chocolate today! Giving up chocolate for lent was no easy task, but I made it and I’m definitely going to go on a chocolate binge for the next few days. It was interesting to not be able to have anything with chocolate. Whenever I crave something sweet I usually reach for a piece of chocolate, but I found myself replacing it with more healthy treats like fruit and yogurt or maybe some peanut butter on a banana. I guess I could have eaten candy instead, but I’m not much of a candy person anymore (can’t eat sour patch kids like I used to when I was little, and warheads, remember those?).

Although, my first instinct is to pick something with chocolate, giving up chocolate helped widen my view about desserts I would’ve never chosen otherwise. I was able to try all sorts of yummy non-chocolate desserts (strawberry tiramisu, salted caramel macarons, maple bacon donuts) on various outings and it didn’t make me miss chocolate at all. Maybe I’ve changed? But, then again I think I would still have to fight the urge to pick something chocolate over a non-chocolate dessert. At least I feel like I’ve tried a lot of new things and I know that I can live without chocolate, but in all honesty I wouldn’t really want to haha.

For Easter, I decided to make mini cupcakes (vanilla with vanilla frosting, it wasn’t Easter yet when I made this hence no chocolate). To make them egg-stra special, I decided to color the frosting with some nice pastel colors and arrange them in an egg carton. This makes for a great gift idea; easy to whip up and cute packaging!

On a side note, if you’re wondering what my first chocolate dessert will be, its a Sprinkles’ Red Velvet cupcake. I also picked up one of their flavors for the season, Brown Sugar Praline, which is really good. Love that praline topping! Too bad its seasonal, I think they should make it one of their regular flavors.

Looks like a regular egg carton from the outside...

Surprise!

A Dozen Mini Cupcakes - Ready for Easter

Sprinkles Cupcakes - Top Row: Brown Sugar Praline and Vanilla Cupcakes, Bottom Row: Red Velvet with a cute bunny

Lucky Green Tea Cupcakes

March 17th, 2010

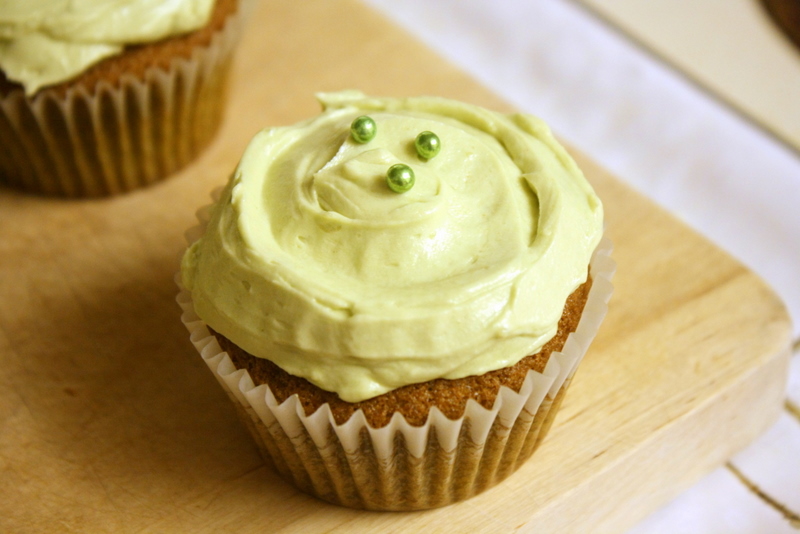
Happy St. Patrick’s Day! In honor of St.Patty’s day, I made green cupcakes, but went the non-traditional route and decided to make green tea cupcakes. Not very Irish at all, but what better excuse than to try something new and green for this holiday.

After doing some research, I decided to try to use a regular vanilla cupcake recipe and add some green tea (matcha) powder. Luckily, for me it turned out well and the combination of the vanilla and green tea tasted good. The best part about these cupcakes was definitely the frosting.  It’s like a lighter more heavenly version of a buttercream frosting. I used a green tea frosting recipe from the Baked cookbook and I’m so glad I decided to try it. This frosting recipe definitely requires more effort, but the results are worth it! The frosting + cupcake made for an excellent pairing. I think everything had the right amount of green tea flavor. It was subtle and not overpowering.

One more thing before I go and eat another cupcake, if you are wondering where you can buy green tea (matcha) powder, you can usually find it at specialty food stores or better yet at Japanese markets if there’s one in your area. If you still can’t find it, you can also order it online. Just make sure you buy unsweetened green tea (matcha) powder. Also, the higher the quality green tea (matcha) powder you purchase, the brighter green your baked goods will turn out. Good luck!

Green Tea Cupcake

Green Tea Cupcake

A peek inside

A Peek Inside

(more…)

Red Velvet Cheesecake

February 14th, 2010

Happy Valentine’s Day!

I thought it would be perfect to make mini heart shaped red velvet cheesecakes for V-day and I’ve been dying to make them ever since I tried it for the first time at Magnolia’s Bakery in NYC. I had to make up my own recipe because I couldn’t really find any red velvet cheesecake recipes. I guess they aren’t that popular yet.

I was scared that this project would become a complete fail for several reasons: 1) I’ve only made one other cheesecake before and that time I had an actual recipe to follow 2) I couldn’t find instructions on baking times for mini cheesecakes, so I had to guesstimate and 3) did I mention that I’ve never done this before?!? Experimenting makes me feel really out of my comfort zone haha.

Anyway, after all my worrying and stressing and peeking into the oven every 5 minutes, the cheesecakes came out a beautiful shade of red and there were no cracks at all. Success! The final test was the taste test and it was…GREAT! It really reminded me of Magnolia’s version (maybe even better? haha) and I’m so excited that I don’t have to fly 3,000 miles to get some now. I topped it with some whipped cream and it complemented the cheesecake perfectly. Make sure to make these for your sweetheart because there’s nothing that says I love you more than a Red Velvet Cheesecake <3

Red Velvet Cheesecake

Red Velvet Cheesecake

(more…)

Mascarpone Chocolate Chip Muffins

February 4th, 2010

I can’t even begin to tell you how GOOD these muffins are. Hands down these are the best chocolate chip muffins. I had been searching  for the perfect recipe for a couple days and I am so glad I did not decide to give up and just pick any old recipe. These muffins are so soft and fluffy, just imagine clouds with pockets of melted chocolate and the mascarpone cheese gives it a suprisingly great subtle flavor.

Many thanks to justjennrecipes.com for posting the recipe! I’m not sure whether or not she created the recipe, but regardless it is definitely a favorite from now on.

Mascarpone Chocolate Chip Muffins
(adapted from justjennrecipes.com)

Ingredients:

  • 1 (8 oz.) package mascarpone cheese
  • 1/4 cup butter, softened
  • 1 egg, room temperature
  • 1/2 cup milk
  • 1/2 teaspoon vanilla extract
  • 1 1/2 cups all-purpose flour
  • 1/2 cup white sugar
  • 3 teaspoons baking powder
  • 1/2 teaspoon salt
  • 1 1/4 cup semi-sweet chocolate chips (I like a lot of chocolate chips)

Directions

  1. Preheat oven to 400 degrees F.  Beat mascarpone cheese and butter together until fluffy. Beat in egg, milk, and vanilla.
  2. Combine the flour, sugar, baking powder, and salt in a separate bowl. Stir flour mixture into wet mixture until just combined. Fold in chocolate chips.
  3. Spoon batter into 12 prepared lined muffin cups.  Filling them until they are almost full. I filled mine up all the way and had no problems with overflowing. They made a nice full muffin top.
  4. Bake for about 20 min or until the top is golden brown.
Mascarpone Chocolate Chip Muffins

Mascarpone Chocolate Chip Muffins

Merry Christmas!

December 25th, 2009

Hope all of you are having a wonderful holiday filled with lots of dessert!

I went to a White Elephant Christmas Party this past weekend and whipped up two really simple and easy treats. Both of the recipes require no baking, are cream cheese based, and can be made ahead; so it saves you plenty of time during this busy season.

I wanted to make something unique and I found the perfect recipe for a Dessert Ball. Think of a cheese ball spread, but instead it’s sweet. This was so easy to whip up and once all the ingredients were combined I just popped it in the freezer until it was time to bring it to the party. The dessert ball was paired with graham cracker sticks to spread on. Everyone at the party was intrigued by the ball. This was definitely a crowd pleaser and perfect for people who like cheesecake tasting dessert.

The other dessert on the menu were Oreo truffles. I like to call these the “Wow Truffles” because every time someone bit into it, the first thing they would say is “WOW! These are so GOOD!”. It even converted my non-chocolate loving friends. You know a dessert is awesome when even people who hate chocolate start eating your chocolate dessert and rave about. The truffles were also a snap to make and had the shortest ingredient list.

IMG_2908

Dessert Ball with Graham Cracker Sticks

IMG_2916

Oreo Truffles aka Wow Truffles - So good even chocolate haters love them.

(more…)

Thankful for All Things Pumpkin

December 1st, 2009

I hope all of you had a wonderful and filling Thanksgiving! Believe it or not, I still feel full from everything I ate over the last few days.

I’m a bit sad that the November is over because there were so many Thanksgiving themed desserts I wanted to try out, but they never made it to reality. I’m not sure how the month flew by so quickly, but I ended up making only a couple things from of my long baking list. I have so many different dessert recipes lined up just for Thanksgiving/Fall, but I guess they will have to wait until next year. The two recipes that actually made it to the oven, were Pumpkin Cream Cheese Muffins and Pumpkin Pie.

The Pumpkin Cream Cheese Muffins were an idea I got from the Starbuck’s version, but I did it semi-homemade style and used a box of Trader Joe’s Pumpkin Bread Mix. It still turned out really well and having a cream cheese center is always a nice twist.

Pumpkin pie was definitely a must bake on my list. At first, I couldn’t figure out which kind of pumpkin pie I wanted to make. I found so many versions of pumpkin pie and they all sounded so good. I decided to make traditional pumpkin pie since I had never made it before. The directions on the recipe made it seem fairly easy, but I messed up just a tad. The filling said it was good enough for one pie but I came out with enough for 2 pies. So, I made the mistake of overfilling the pie thinking it would fit…bad idea. I filled it up so much that I had a difficult time putting it in the oven without trying to spill too much. Another reason overfilling your pie is a huge mistake is that I didn’t take into account that it would rise just like any other baked good, so as it was baking it overflowed a little. But, thankfully it didn’t affect the overall taste; it just didn’t look as pretty as I would’ve liked.

Trader Joe's Pumpkin Bread & Muffin Mix and a Log of Cream Cheese

Trader Joe's Pumpkin Bread & Muffin Mix and a Log of Cream Cheese

Cream Cheese Centers

Cream Cheese Centers

Pumpkin Cream Cheese Muffins

Pumpkin Cream Cheese Muffins

Cream Cheese Goodness

Cream Cheese Goodness

Ready Made Crust

Ready Made Crust

My Overfilled Pumpkin Pie

My Overfilled Pumpkin Pie

Making Decorative Leaves

Making Decorative Leaves

Acorn & Oak Leaf Cut-outs

Acorns & Oak Leaves

My Very First Pumpkin Pie and Definitely Not the Last!

My Very First Pumpkin Pie and Definitely Not the Last!

(more…)